Docker is a platform designed for developers and system administrators to build, run, and share applications using containers. A container is essentially a process running in a self-contained environment with its own isolated filesystem. This filesystem is created from a Docker image, which contains everything necessary to run the application—compiled code, libraries, dependencies, and more. Images are defined using a file called Dockerfile.
Building Docker images is straightforward, but optimization is often overlooked, leading to bloated images. As services evolve with new versions, added dependencies and configurations make the build process more resource-intensive.
Images that start small, like 250MB, can grow to over 1.5GB, increasing both build times and security risks by introducing unnecessary libraries.
DevOps teams must focus on optimizing images at every stage. Lean images ensure faster builds, deployments, and smoother CI/CD pipelines. Smaller images are especially valuable in container-orchestration tools like Kubernetes, reducing transfer and deployment times across clusters.
How to Reduce Image Size?
Container image of an application typically consists of base image, dependencies & configs and unwanted softwares.
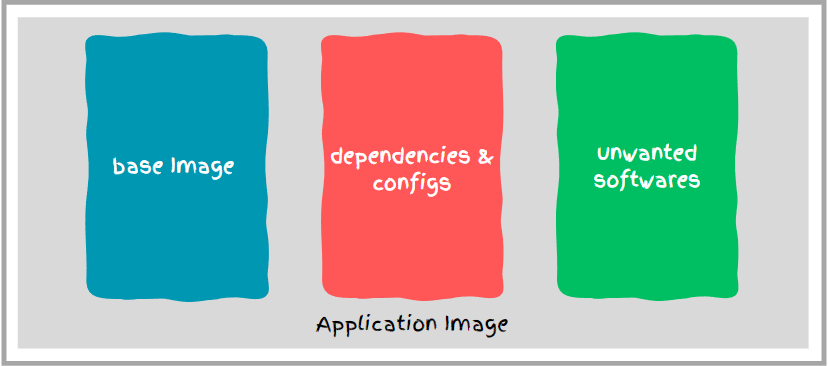
So it all comes down to how efficiently we manage our resources inside the docker container.
Let’s look at different established methods of optimizing Docker images.
- Using minimal Base Images
- MultiStage Builds
- Minimizing the numbers of layers
- Using dockerignore
- Understand Caching
Use Minimal Base Image
The first step in optimizing your Docker image is selecting the right base image, ideally one with a minimal OS footprint.
We can make use of alpine images in such circumstances which are small and secured as well.
Now, let’s see the Python alpine image.

Python latest image:

Python alpine base image is only 14.25MB whereas latest image is 363.53MB
You can further reduce the base image size using distroless images. Distroless images are even smaller than minimal OS images like Alpine. They exclude package managers, shells, and other unnecessary utilities, significantly reducing the attack surface and making the image more secure.
However, since there’s no shell or debugging tools, you’ll need to rely on external debugging methods.
Use Docker MultiStage Build
In multistage build, we use intermediate images (build stages) to compile code, install dependencies, and package files in this approach. The idea behind this is to eliminate unwanted layers in the image.
After that, only the essential app files and required libraries are copied into a new, minimal image. This results in a lighter, more efficient image optimized for running the application.Thus,it results in:
- Reduced image size: By removing unnecessary build artifacts, the final image is lighter.
- Improved performance: Fewer layers mean faster startup, more efficient resource usage, and better responsiveness.
Let’s see an example illustrating a multi stage build.
A simple Dockerfile for node.js application would be like this:
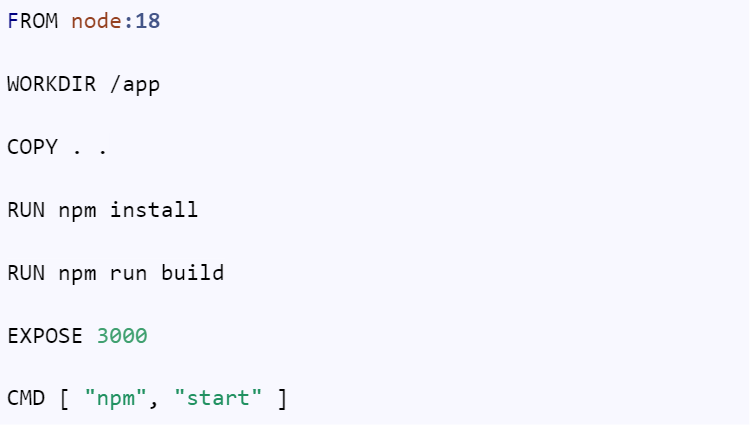
Let’s see the size of the image by building it.

After build is completed .Let’s check it’s size

Now,let’s create an image using a multistage build.
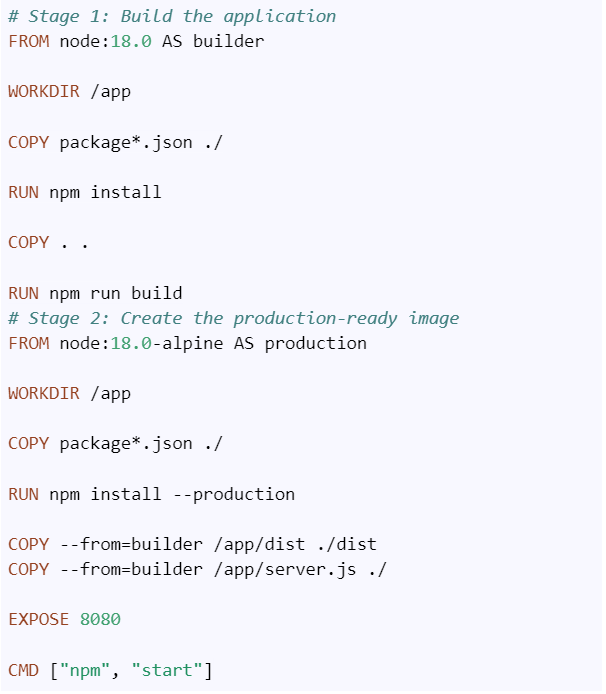
Key Points:
1. Stage 1 (build):
- Use a Node.js image to install dependencies and build the application.
- This stage includes all the tools required for building the app, which can be discarded later to keep the final image smaller.
1. Stage 2 (production):
- Uses a separate lightweight image (in this case, still node:18-alpine but without the build tools).
- Only the production-ready files from the dist folder and production dependencies are copied.
Let’s see the size of the image by building it.

After build is completed .Let’s check it’s size
The new reduced image size is 204MB. Earlier it was 1.01GB.
Minimize The Number of Layers
Docker images are built using a layered file system, with each instruction in the Dockerfile creating a new layer. Each RUN , COPY, FROM creates a new layer.
To optimize the size of the image, you should reduce the number of layers by combining related commands using the && operator. Additionally, cleaning up unnecessary files and dependencies within the same RUN instruction will help streamline the image build process.
Let’s look at an example: Create a ubuntu image with updated & upgraded libraries, along with some necessary packages.
A Dockerfile to achieve this would be as follows:
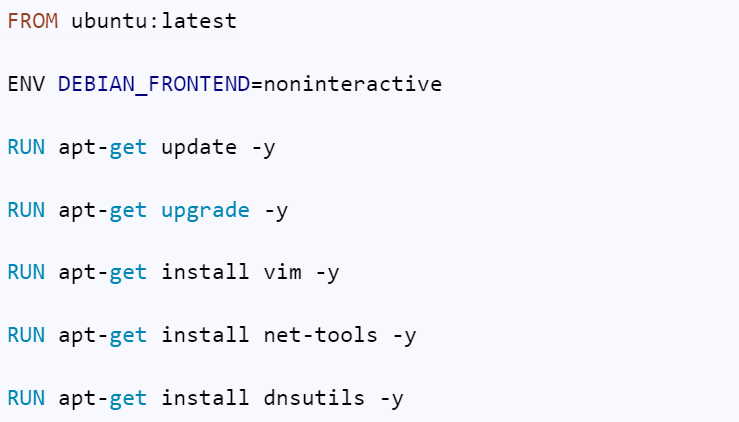
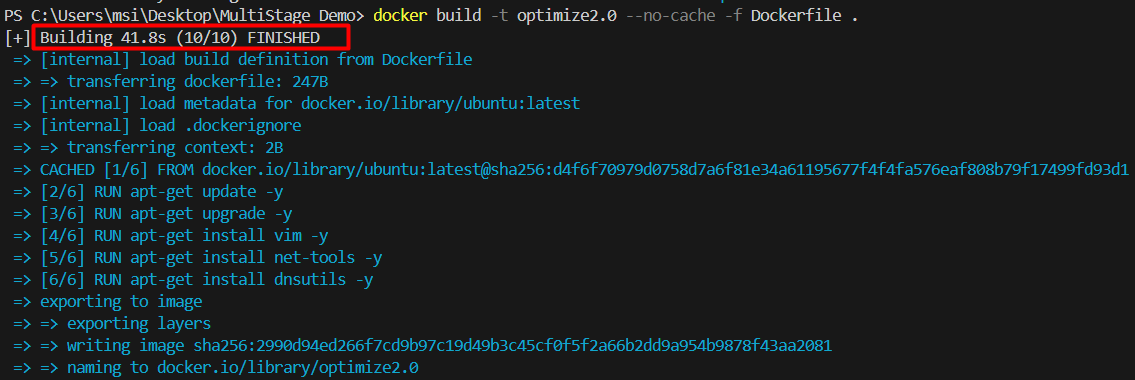
Now, we look at the build time for this image.
Let’s combine the RUN commands into a single layer.

Let’s look at its build time for this image.

Thus, the execution time is reduced to 26.1 sec from 41.8sec. Also reducing layers also reduces image size as well .
Use Dockerignore
When building a Docker image, it’s crucial to include only the files essential for your application to run. This might seem obvious, but it’s often overlooked. A .dockerignore file is a simple yet powerful way to achieve this.
By specifying which files and directories should be excluded from the image, you reduce the size of the build context and make the build process faster.
Using .dockerignore, you can prevent unnecessary files, like source code not needed for runtime, build artifacts, and other irrelevant data, from being copied into the image.
This keeps your image lightweight and secure—fewer files mean fewer potential vulnerabilities to worry about. Therefore, always be mindful of what gets included, and make sure to avoid unnecessary content in your Docker image.
Understanding Cache
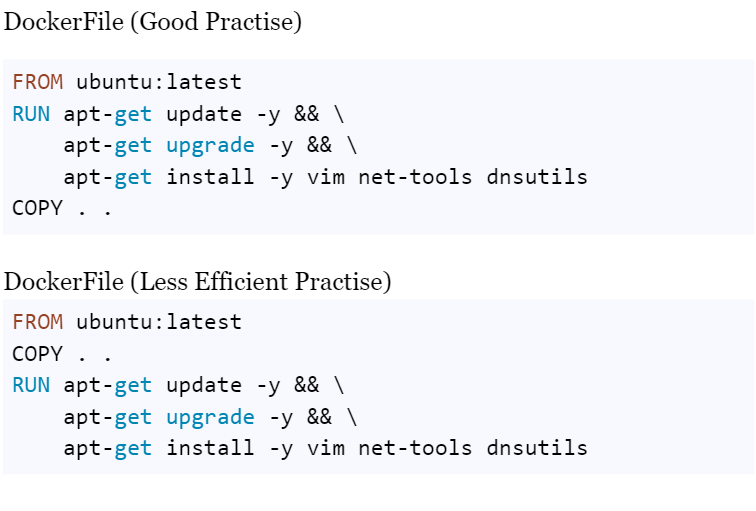
When rebuilding a Docker image with minor code changes, caching can significantly speed up the process. Docker’s layered file system allows it to cache layers and reuse them if they haven’t changed.
To optimize this, it’s best to place commands that install dependencies early in the Dockerfile, before COPY commands. This way, Docker can cache the layers with dependencies, allowing faster rebuilds when only the code changes.
Since COPY and ADD invalidate the cache for subsequent layers, Docker rebuilds everything after them. Therefore, it’s ideal to put commands that rarely change at the top of your Dockerfile, minimizing unnecessary rebuilds.
Some Docker Optimization Tools
Here are some Docker image optimization tools that can help you minimize image size, improve performance, and enhance security:
1. Dive:
- A tool to explore the contents of Docker images, analyze their layers, and understand which parts contribute to the size. It helps in finding inefficient layers that can be optimized.
- GitHub: Dive
2. DockerSlim
- Shrinks your Docker images by removing unnecessary files and libraries while preserving essential functionality. It can reduce image size significantly.
- Website: DockerSlim
3. Hadolint
- A linter for Dockerfiles that identifies common issues, inefficiencies, and best practices to improve the Dockerfile and image optimization.
- GitHub: Hadolint
4. Trivy
- A comprehensive security and vulnerability scanner for Docker images that can also be used to detect unnecessary packages or outdated dependencies.
- GitHub: Trivy
Conclusion
Optimizing Docker images is essential for improving performance, reducing build times, and enhancing security. By carefully selecting lightweight base images, using multi-stage builds, leveraging .dockerignore to exclude unnecessary files, and employing tools like Dive, DockerSlim, and Hadolint, you can significantly reduce the size of your Docker images.
These optimizations not only streamline the CI/CD process but also ensure faster deployments, especially in containerized environments like Kubernetes. Ultimately, optimizing Docker images leads to more efficient resource usage and a more secure application delivery pipeline.

